
I’m an IT professional and passionate about my work. In this blog I’ll be implementing common technological solutions used in today’s businesses. I have over 25 years of experience in the field. This experience includes setting up data centers, networks, and perimeter security. It also covers virtualization, containers, and applications.
I hope you enjoy this work and look ahead to your comments and suggestions.

Creating a Cost-Effective Home Lab with VLAN Setup
I initialized my home lab environment by visiting a local hardware store. I acquired components necessary for upgrading my legacy CPUs. After some hardware tuning, I successfully optimized the systems for virtualization workloads. Here’s a summary of the updated setup:
Server1
- Name: BATTY
- OS: proxmox-ve: 8.4.1
- Manufacter: Gigabyte Technology Co., Ltd.
- Model: H81M-H
- CPU: Intel(R) Core(TM) i5-4460 CPU @ 3.20GHz
- RAM: 32GB
- Disk 0: 512GB SATA SSD
- Disk 1: 2TB HDD
- Disk 2: 2TB HDD
- Disk 3: 2TB HDD
- NICs: 2
Server2
- Name: GAFF
- OS: proxmox-ve: 8.4.1
- Manufacter: ASUS
- Model:
- CPU: AMD Ryzen 7 5700G with Radeon Graphics
- RAM: 32GB
- Disk 0: 512GB NVME SSD
- Disk 1: 1TB SDD
- Disk 2: 1TB HDD
- Disk 3: 1TB HDD
- NICs: 2
Server3
- Name: BRYANT
- OS: proxmox-ve: 8.4.1
- Manufacter: Gigabyte Technology Co., Ltd.
- Model: H610M H V3 DDR4
- CPU: Intel(R) Core(TM) i5-14400
- RAM: 32GB
- Disk 0: 1TB M.2 PCIe SSD
- Disk 1: 1TB SDD
- Disk 2: 1TB HDD
- Disk 3: 1TB HDD
- NICs: 2
PC1
- Name: INTELNUC
- OS: Microsoft Windows 10 Pro
- Manufacter: INTEL
- Model:
- CPU: Intel(R) Core(TM) i5-6260U CPU @ 1.80GHz
- RAM: 16GB
- Disk 0: 256GB M.2 PCIe SSD
- Disk 1: 256GB SDD
- NIC: 1
PC2
- Name: LENOVO
- OS: Microsoft Windows 10 Pro
- Manufacter: LENOVO
- Model: 20HDCTO1WW
- CPU: Intel(R) Core(TM) i5-7200U CPU @ 2.50GHz
- RAM: 12GB
- Disk 0: 256GB M.2 PCIe SSD
- NIC: 1
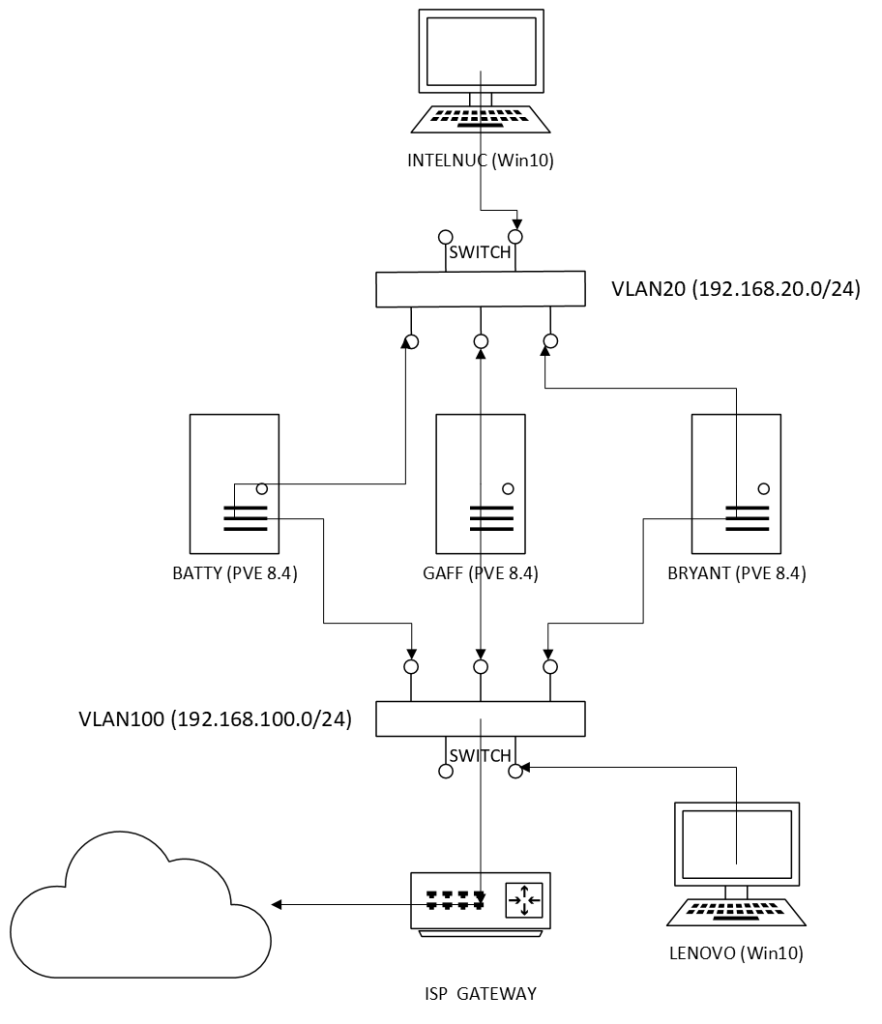
I deployed a manageable Linksys switch for network segmentation. I configured two VLANs to logically separate the lab infrastructure from the primary home LAN. This allows for traffic isolation and better control of inter-VLAN routing. The upstream connectivity to the internet on the physical servers is routed through the ISP gateway. Our VMs will be completely isolated and won’t have direct connection to the world. In the next posts, we’ll set up a virtualized OPNsense firewall. It will be used for routing. This will guarantee thorough isolation of the VMs in our lab.
If you don’t have a manageable switch, stop by a local computer store. Buy two cheap 4-port GiB switches to set up your networking. There are options for less than $15 that would fit well.
These are the only two physical VLANs we are going to need for our whole lab:
- VLAN 20: Management and VxLAN
- VLAN 100: Edge (Connection to the real world)
Here’s a diagram of the physical network configuration:
As you can notice, we don’t need ultra expensive hardware to set a quite decent and operational home lab. We can start testing with a few old computers with extra memory and SSD disks.
In the next entry, I’ll walk you through the deployment of the Proxmox nodes. I will also cover the configuration of the cluster for high availability:
That’s it for now. Don’t forget to leave your comments and suggestions.

Leave a comment